
Just a reminder to update your RSS feeds and Bookmarks to:
lifestylecrafts.com/blog
Thanks!
3.16.2011
1.24.2011
New Site and Blog!

The new site/blog has finally launched! Click here to see the new blog and please update your links and RSS feeds. Posting on this blog will stop immediately and we hope to see you at the new location.
By visiting the new blog, you will receive a discount code to receive 20% off your entire order on the new site!
See you there!
1.14.2011
Join the Revolution!

The Revolution is back! Lifestyle Crafts is re-releasing the Revolution Die Cutting tool for a limited time only. The sleek Revolution tool makes die cutting quick and easy. Learn more about the Revolution here. Look for it at your nearest retailer location or purchase it directly from our brand new website that will launch next week!
1.12.2011
A Romantic Dinner with the Love Release!
Patch, one of our design team members set up this Valentine's Day dinner for his wife using the dies from the Love release. We are loving this sophisticated side of Lifestyle Crafts and it's proof that these dies are extremely versatile! Patch was nice enough to send us instructions on how he set up this surprisingly simple dinner.
I wanted to set up a nice romantic table for two that felt handmade but also sophisticated. The Mini Takeout Box was my favorite. It was SO easy and with this choice of gold leafed paper I think it came out so nice. A perfect spot for a simple gold chain and a promise.
The candle wraps were easy. I used the XO border die and wrapped them around the candle.

The Votive holders were so fast and anything you put a soft flame behind always comes out looking great. Using the Love Pop-ups, I just measured the paper around the votive holders I had at the house, cut to size, and zipped it through the Epic and glued the seams. Done.

The mini valentine was my wife's favorite, I added the first lines of a poem read at our wedding, 'My truelove has my heart, and I have his' And instead of the the word 'heart' the clasp of the envelope took it's place. Perfect.

The Place mats were simple, I punched out 8 hearts (4 with scalloped edges and 4 plain nesting hearts, that way I could punch two styles at the same time) and glued them in the circle creating that quilted star pattern in the middle. I adjusted them to fit my plates and glued them in place with a glue stick.
The XO confetti was just the XO border die, snipped apart instead of left together. I also thought how great it would look if you had a few different lettering dies to do lots of sizes of X's and O's, maybe throw some glitter down with 'em so the table has some sparkle.


Patch's advice: Use what you have. Your house is filled with things that can be looked at in a different way and sometimes your plans need to change. Be flexible and the whole experience should be enjoyable. I had a lot of fun putting this table together and I'm pretty pleased with the result.
Thanks for the great ideas Patch!
I wanted to set up a nice romantic table for two that felt handmade but also sophisticated. The Mini Takeout Box was my favorite. It was SO easy and with this choice of gold leafed paper I think it came out so nice. A perfect spot for a simple gold chain and a promise.
The candle wraps were easy. I used the XO border die and wrapped them around the candle.
The Votive holders were so fast and anything you put a soft flame behind always comes out looking great. Using the Love Pop-ups, I just measured the paper around the votive holders I had at the house, cut to size, and zipped it through the Epic and glued the seams. Done.
The mini valentine was my wife's favorite, I added the first lines of a poem read at our wedding, 'My truelove has my heart, and I have his' And instead of the the word 'heart' the clasp of the envelope took it's place. Perfect.
The Place mats were simple, I punched out 8 hearts (4 with scalloped edges and 4 plain nesting hearts, that way I could punch two styles at the same time) and glued them in the circle creating that quilted star pattern in the middle. I adjusted them to fit my plates and glued them in place with a glue stick.
The XO confetti was just the XO border die, snipped apart instead of left together. I also thought how great it would look if you had a few different lettering dies to do lots of sizes of X's and O's, maybe throw some glitter down with 'em so the table has some sparkle.
Patch's advice: Use what you have. Your house is filled with things that can be looked at in a different way and sometimes your plans need to change. Be flexible and the whole experience should be enjoyable. I had a lot of fun putting this table together and I'm pretty pleased with the result.
Thanks for the great ideas Patch!
1.11.2011
The Love Release has arrived!


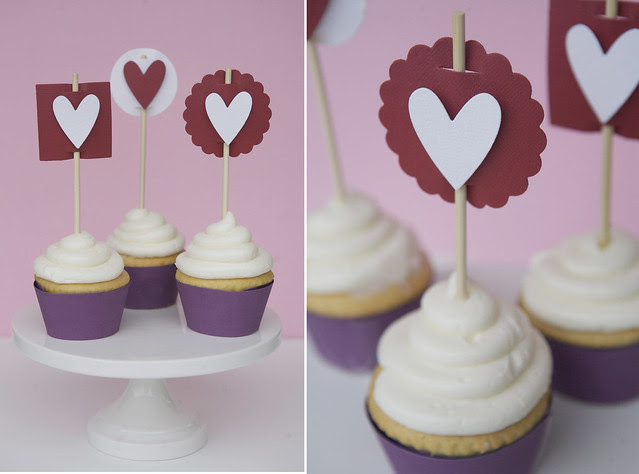

Love has arrived and we are excited to share some amazing ideas and projects with you throughout the week. As you can see, these dies are very versatile and can be used for many things such as: water bottle wraps, cupcake toppers, gift wrap, mini-valentines, garlands, straw toppers, layouts, cards and more! Orders are currently shipping to retailers, so dies will be in your local stores very soon!
See the entire release here.
Also, check out more projects submitted by our design team on our Facebook page.
1.07.2011
Get Excited.
Love is coming your way this Tuesday... check back for the latest release and project ideas from Lifestyle Crafts.
1.06.2011
Monogrammed cards with the L Letterpress.
We recently received a submission that we wanted to share with everyone! Our new friend, Carrisa Wiley made these beautiful cards for personalized gifts to hand out during the holidays. They even have corresponding letterpressed monograms! She used the Damask and Scholastic printing plates to complete this look. Notice that die-cutting was also used here. Nesting Circles and Nesting Scallops are great for hosting a monogram and putting the finishing touch on a project. The ribbon is also a nice touch and really adds character to the project. Great work Carrisa and thanks for sharing!


We love hearing from others about what they've created with our products. If you would like to share your project with us, submit it to our Facebook page.
*images courtesy of Carrisa Wiley
We love hearing from others about what they've created with our products. If you would like to share your project with us, submit it to our Facebook page.
*images courtesy of Carrisa Wiley
12.22.2010
More Holiday Ideas.
With the holidays getting closer and closer, we wanted to share a few last minute inspiration ideas! Laura, our product designer crafted this simple garland using our nesting stockings, old book paper and cardstock.


We are also loving these ideas from designers Armelle Jewelry and No Biggie. Check out their blogs for full tutorials on the projects seen below using dies from the Winter Wonderland release.

Left image courtesy of No Biggie and right image courtesy of Armelle Jewelry.
We are also loving these ideas from designers Armelle Jewelry and No Biggie. Check out their blogs for full tutorials on the projects seen below using dies from the Winter Wonderland release.
Left image courtesy of No Biggie and right image courtesy of Armelle Jewelry.
12.16.2010
A Holiday Garland with Nesting Circles and the L Letterpress.


You can never go wrong with a garland, especially for holidays because you can re-use them every year! We love using our cutting dies with letterpress projects and here we showcase our nesting circles paired with the Jubilee plate.
Happy holiday crafting!
What we used:
Nesting Circles
Jubilee Printing Plate
Silver Ink
Alphabet
12.14.2010
Another Tree!
Today we're showing off another awesome project from one of our design team members, Patch. He made this beautiful tree out of an old book he found at a thrift store, our scalloped cupcake liner from the Essentials release, and the flourish from the Black Friday release.


We love the innovative thinking used to create this project. This is proof that our dies can be used for so many different things! Doesn't it look beautiful on the mantle?
P.S Become a fan of our brand new Facebook page here and be entered to win a L Letterpress Combo Kit!
Stay tuned for a few Letterpress projects to be featured later this week.
12.13.2010
A Christmas Tree with our Nesting Scallops!
Isn't this Christmas Tree made with our nesting scallops wonderful? One of our design team members Leah Killian came up with the idea and we just had to share. She was kind enough to send us instructions and photos of the process. Thanks Leah!
 1. Cut a cardboard base slightly smaller than your largest scallop.
2. Poke a kebab skewer through the center of the base, and secure with glue.

3. Cut 3 of each size of scallop in coordinating scrapbook paper (use a heavier weight paper).
4. Put a small hole in the center of each scallop.
5. Put a dab of glue on the hole before you load them onto your skewer from largest to smallest one at a time- leave a small space between each one.


The finished product!

2. Poke a kebab skewer through the center of the base, and secure with glue.
3. Cut 3 of each size of scallop in coordinating scrapbook paper (use a heavier weight paper).
4. Put a small hole in the center of each scallop.
5. Put a dab of glue on the hole before you load them onto your skewer from largest to smallest one at a time- leave a small space between each one.
6. Once you reach the top, use stars from the basic cupcake liner collection glued back to back to cover the tip of the skewer.
7. To make larger or smaller trees, just cut more or less scallops. I also inked the edges of my scallops.The finished product!
12.10.2010
The Essentials Release.
Did you know that Lifestyle Crafts makes cutting dies? Lifestyle Crafts and Quickutz have recently merged. Our Epic 6 tool is compatible with both cutting dies and the L Letterpress and we are very excited about educating everyone about the brilliance of using the two together. Click here to see our new line of essential cutting dies. Below are some fabulous projects done by some of our design team members.
A garland and party picks from Heather Adams


Baby shower by Marcelle Calder
Gorgeous favor boxes, place settings, stationery, and garland by Caroline Drake of Armelle Jewelry


Stay tuned to see more projects from this release. We have some really wonderful Christmas ideas that show the L Letterpress and cutting dies in action together!
A garland and party picks from Heather Adams


A beautiful Christmas card using the Jubilee printing plate, A7 collection, all-in-one belly band, and fancy envelope tabs.
A darling "Petal Party" collection from designer JoAnn Colledge using several dies from the release.

Baby shower by Marcelle Calder
Gorgeous favor boxes, place settings, stationery, and garland by Caroline Drake of Armelle Jewelry
Stay tuned to see more projects from this release. We have some really wonderful Christmas ideas that show the L Letterpress and cutting dies in action together!
11.29.2010
Christmas Cards with the L Letterpress!


These Christmas cards using the L Letterpress are gorgeous, classy, and can be made the in the comfort of your home! We used the Jubilee printing plate set to make this happen. Notice the holly leaf blind embossed on the belly band. A simple addition that goes a long way! What a great way to kick off the holiday season.
What we used:
Lifestyle Crafts Jubilee Printing Plate
Lifestyle Crafts Red and Silver Ink
Lifestyle Crafts A7 Flat Cards
Happy Holidays!
11.03.2010
We’re still here.

You may have noticed our website and blog have been a little quiet lately. We’re busily working on a website and blog redesign which will make it easier for you to search, shop, and get inspired!
We will continue to offer you great new product releases in the meantime, so check back soon to see our new product offerings.
Cheers!
The Lifestyle Crafts team
6.02.2010
National Stationery Show
We're back from NYC and had a great time at the National Stationery Show! It was great to be able to meet so many people and show off all of the Lifestyle Crafts products...including new printing plate designs and cutting dies (watch for more detailed info on these products in the next few months)!
Here are a few photos from the show....


Here are a few photos from the show....

Nate and Gary hanging signage.

Laura wondering if our booth will ever come together???

Signage at the booth.

We were asked to do a Daily Demo on the first day of the show. It was a great opportunity to let attendees use the product and create some fun letterpressed cards and projects.

Michelle teaching the Daily Demo.

Our booth stayed busy the entire show! Here's Michelle at the demo station showing people how to die cut and letterpress with the Lifestyle Crafts product line.

Laura taking orders.

Jennifer showing the product line.

Nate talking about Lifestyle Crafts.

Gary selling the product line to potential customers.
Thanks to everyone who stopped by our booth!
Subscribe to:
Posts (Atom)


